Pages

Monday, December 6, 2010

Office Redo


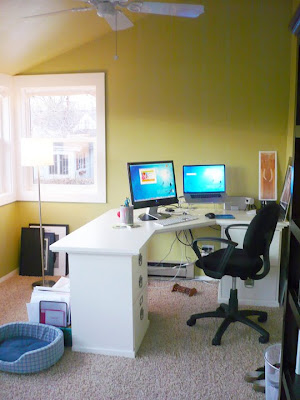
OFFICE!! (Green isn't as slimy as it looks- more like a subtle avocado).
Anyways- I still need to finish the "chalk board" ..and install real shades. The one's I'm using are those paper temporary shades.


OK I know the mountains are hard to see in this photo- but in person you can see them I swear! :)

Friday, December 3, 2010

It's beginning to look a lot like Christmas...

Well, maybe not since it's 74 degrees outside right now, BUT I'm definitely getting in the holiday spirit regardless! While reading my many wedding blogs during lunch at my desk, I ran across the following holiday poster art. How cute is that? (FYI...I found the original link on the wedding blog Marry You Me.)

I recently hung a collection of photos just off of our kitchen and haven't gotten around to picking an 8x10 photo for one of the frames. Needless to say it's been empty for awhile, but when I saw this poster I knew it would be a perfect temporary fix for my sad, white frame! I easily downloaded, printed it out and I think it looks great. Holiday decorating has begun! Check out some pics of my pics :)
--DS

Sunday, October 10, 2010

Office Reveal

Drum roll please..........
Say hello to my new office! Well, sort of new. I finished it off a month or two ago, but didn't get around to taking pictures, and since our desks happened to be tidy it seemed like now or never! I really like how it all turned out, it's a very cozy room. I love the picture ledges that display photos and our degrees. I also hung a series of three magnetic boards to put up random photos (still in progress). One day I'll get curtains hung, but for now I'm content. --DS


Brutus really likes the office too :)


Look Kirin, the books are still color organized, just as you left them.

View from my desk


Magnetic photo board

Tuesday, October 5, 2010

Spooky Spiders

The temperatures finally dropped over the past week into the 70s/80s during the day and a "frigid" 40s/50s in the evening. Our nasty hot summer in Dallas seems to be over, hallelujah!

It's hard to believe it's already October, which means all the fun holidays are just around the corner. We've just started to get in the Halloween spirit over here and decided we need to decorate! Josh came home last night and surprised me with some fun Halloween goodies. He immediately put these creepy crawly spiders in various spots around the house, and I added a few more today. I think they look fun on the hanging pendant light over our kitchen table.


Josh also picked up some mini pumpkins and these pretty Fall flowers.


He brought home a bunch of other decorating items from PB and Crate & Barrel for me that I'll put out soon. Does he know me or what...two of my favorite home stores. --DS

Punkie...do you have any fun Halloween decorations?

Tuesday, August 31, 2010

The Grass is Always GREENER...


Finally Mark and I scored some grass!!


Here's a what we started with...(well this is actually after digging out most of the ugly Pampas grass and gnarly shrubs the previous owner was so thoughtful to plant).


We had to dig up the entire sprinkler system...and broke a few heads and pipes along the way..."good times"... (Also-notice the new plants in front of the porch and Dogwood tree my parents helped us plant during their visit!!).


My "side project" (while Mark figured out the sprinkler system) was to put in the slate stone path. My mom helped me with the positioning...and then I leveled them into the ground. (The next step is to add river stones and creeping thyme in between the slate- but for now- the dirt will do).


Back to the grass...
After digging,tilling, sprinkler testing, fertilizing, raking, and watering the dirt for two 10 hour days- we FINALLY got the sod down. Our neighbor gave us some tips on laying sod- notice the "brick" pattern....which apparently should disappear soon if all goes well.


Here's Mark realizing that we still have the right-side of the lawn to do...


"lady fingers" ...:)

....Day 3 of the sod laying starts in about 24 minutes...more photos to come...--AY

Friday, August 20, 2010

Light project

Just this past weekend I finally installed a light fixture over our kitchen table. After looking online for awhile for the "perfect" light, with a simple pendant shade in mind, I settled on the CB2 Eden pendant lamp. It was the most reasonably priced and the size seemed perfect.
http://www.cb2.com/family.aspx?c=120&f=4773&fromLocation=search

Now, the only glitch is that it is a plug in light. I read some of the reviews on the CB2 page and it turns out a lot of people hardwired it. I decided to buy it and in the meantime figure out how to do this. I did a little research online and, with the help of Kirin, actually ran across the following blog post courtesy of one of my favorite DIY blogs, YHL.
http://ourhumbleabowed.wordpress.com/2010/06/10/how-to-light-it-up/

Turns out this couple installed the exact same lamp I just bought. I was a little nervous about actually cutting the cord plug off and connecting the wires, but they did it so I had confidence I could too. I'm not a "handy" chick, but I'm learning. It can't be THAT difficult to figure this thing out.

Since there was an existing light fixture that we took down (because it was just plain ugly), the wiring was ready to go. The only piece missing in my project was the ceiling plate, so I went to Lowe's and bought one (funny enough I ended up buying the same one as the couple in the link above because it was the only one they sold, which was a little disappointing - I wanted something more modern looking). Once I was ready to start I turned off the breaker to the kitchen lights so I wouldn't electrocute myself - that wouldn't be too pretty. Next, Josh and I measured the cord from the ceiling to how low we wanted the light to hang over the table, marked it, along with a spot on the ceiling for the hook to hang the cords on so it would then be centered over the table (we've got a weird angled ceiling and if the light fixture hung straight down from the ceiling it would be right in the middle of the walking path). Then it was time to cut! I stripped away the plastic cord to expose the wires, then connected them to the two exposed wires in the ceiling, turned the breaker back on, crossed my fingers and flipped the switch. LIGHT! It worked - I was so proud! So now that we knew the wiring worked, we went ahead with drilling a hole for the hook and then screwed in the ceiling plate, setting it all up.

Here's a look at our stellar work :)


I am really happy with the final result, and had to pat myself on the back for successfully accomplishing my first experimental DIY home project. --DS
Thursday, July 8, 2010

My office has color!

Yes, you read that right, I FINALLY painted our office! While most people choose to sit around the pool and bbq over the July 4th weekend, I was hard at work Saturday painting. It was a long day, but I am very pleased with the outcome - yay color! I chose the color "Wythe Blue" by Ben Moore, but opted to buy Lowe's brand of paint, Valspar, to be on the cheap side. That may have been my only big mistake. I ended up using close to three gallons of paint. I think if I had gone with the better quality, Ben Moore, it might have been different. I think the root of all evil turned out to be the walls themselves. Unfortunately all the walls in our home are textured, therefore getting paint to cover every nook and cranny took a lot of rolling.

First up was taping around the windows and french doors. I used green Frog Tape, which was awesome, I highly recommend it.


Next I cut in along the ceiling, around the windows and the wall joints. I wasn’t planning on taping along the floorboards, but after painting around the ceiling I quickly learned taping would be the best option – and I’m so happy I did. The frog tape created a clean, crisp edge.


I used a roller for the walls, and ended up painting two full coats, then touched up some missed spots. I removed the tape, let it all dry over night, and voila! It feels so nice to have a little color in our all beige house. --DS


Thursday, July 1, 2010

An easy way to test paint samples on your walls

I've been trying to decide on paint colors for various rooms in our house for awhile now. There are paint swatches all over my house, it's ridiculous. I recently learned a new trick from a designer that I wanted to share, and wish I had thought of from the get go.

To avoid the not so attractive paint blocks all over your walls, just paint the color sample on posterboard. Yes, go out and buy a sheet of posterboard that we used for projects back in school (it felt kind of funny to buy a few sheets, I had flashbacks of the millions of times I used them back in the day). Cut the posterboard in half, unless you want a really large sample. Then use painters tape (I used the green frog paint tape I had on hand), and tape it down to a table or counter, shiny side down, so you paint on the matte side. Leave an inch or so border on the posterboard when you tape. Paint the posterboard, then leave it taped down until the paint dries. Slowly peel off the green tape from all sides, and you've got a great large color block of your sample! Use the painters tape to tape it on the wall in the room you want to paint.


What's great is that you can move the posterboard around to different walls in the room to see the color in different lighting. And if you're like me and now have two shoe boxes full of different colors, be sure to write the paint color on the posterboard so you won't have to guess what it is later!!

I think I'm going to finally paint the office this weekend - pics to come next week! --DS

Sunday, June 27, 2010

New couch and a table that actually fits!

Our new sectional couch was finally delivered last week. Josh is giving it a test run by taking a nap. The corner wedge is definitely comfortable.


Kirin visited this weekend - yay, a visitor!! Of course I was happy to see her for many reasons, but I've been especially looking forward to having her here because she has great taste in home decor. I've been overwhelmed with the blank slate I have with my new home. Even though she was a little under the weather, we accomplished a lot. We bought a kitchen table and chairs from World Market that actually fit in the space, it looks great!


We also picked up some nightstands for the master bedroom (I'll post pictures of these soon, along with our new PB headboard). I finally decided on paint colors for the house and plan to start with the office in the next couple weeks. Lots of fun projects and updates to post soon!!! THANK YOU KIRIN!!!! --DS

Friday, June 11, 2010

Happy Friday

From little Brutus.


Crazy Brutus and Lolo in action.

Cleaning up the garage

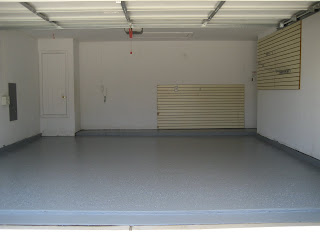
Last weekend we finally got around to painting the garage floor (we were "planning" to do so before moving in back in April). We first swept out the garage, then Sabrina went crazy with the powerwasher to really get the grime off. After letting the concrete dry overnight, we then got to painting! We used the "Epoxy Garage Floor Coating" kit from Quikrete. Since we have a two car garage we needed two of these kits, in gray.


Here is a "before" picture of the garage.


We used a brush to paint all the edges, then used a roller attached to an extension pole to paint the floor. There are color flakes included in the kit that you sprinkle on the wet paint to add some texture or glitz to the floor. If you use the flakes you have to paint in small sections. Paint then sprinkle, paint then sprinkle. I painted, Sabrina sprinkled. Here's a shot of the work in progress.


Here is a closeup of the color flakes.


A couple hours later, here is the finished product!!!


It looks soooo much cleaner and slick. The coating will make it much easier to clean oil drips, etc. Just hose it down! Now we just have to repaint the walls....some day. --DS

Saturday, June 5, 2010

Denver House....

Here are SOME photos of the house...as you can see- there's a lot of beige we need to paint over ..... So far we've only tackled the bedroom- the color is called "Rocky Mountain Sky"- how could I not pick that one! Anyways...these will suffice for the "before" photos...hopefully the "after" photos will be coming soon! :)- AY